
Template
What Is a Content Inventory? (Definition, Template & How to Create One)

A content inventory is a quantitative catalog, typically stored in a spreadsheet, that documents every content asset on a website, where each asset lives and who owns it. A content inventory answers the question of what exists before any quality judgment. Crawl tools like Screaming Frog collect the initial URL list for the spreadsheet.
- Crawl or export all URLs, then enrich rows with GA4, Search Console and owner data
- Serves as source of truth for redesigns, CMS migrations, gap analysis and SEO audits
- Differs from a content audit, which evaluates quality after the inventory exists
- Example: rows flagged Redundant, Outdated or Trivial get merge, refresh or delete actions
A content inventory is a complete, structured catalog of every content asset on your website, typically stored in a spreadsheet, documenting what exists, where it lives, and who owns it. If you have ever inherited a site without knowing what is on it, prepared for a CMS migration, or tried to run a content audit without a starting point, you have already felt the gap a content inventory fills.
This guide explains what a content inventory is, how it differs from a content audit, exactly what to include, and how to build one step by step. You will also find a template structure, tool recommendations, and a framework for deciding what to do with your content once it is cataloged.
What Is a Content Inventory?
A content inventory is a quantitative catalog of all web content assets on a website. It answers the question: what do we have and where is it?
According to the Nielsen Norman Group, one of the leading UX research organizations, a content inventory is "a list of every piece of digital content you currently have, captured at either the page or asset level." A good website content inventory includes specific characteristics about each piece of content, not just a URL list.
A complete inventory typically covers:
- All web pages (blog posts, landing pages, product pages, category pages, help docs)
- Documents (PDFs, whitepapers, guides)
- Media files (images, videos, audio)
- Metadata (page titles, meta descriptions, keywords)
- Structural data (URLs, content type, publication date, last updated date)
Unlike a content audit, an inventory does not evaluate whether the content is good, it simply documents that it exists. Think of it as taking stock of your warehouse before you decide what to keep, sell, or throw away.
Content inventories are most often stored as spreadsheets in Google Sheets or Excel, though dedicated tools can automate the initial data collection. The spreadsheet is then enriched with SEO data, analytics, and governance fields.
Content Inventory vs. Content Audit: What's the Difference?
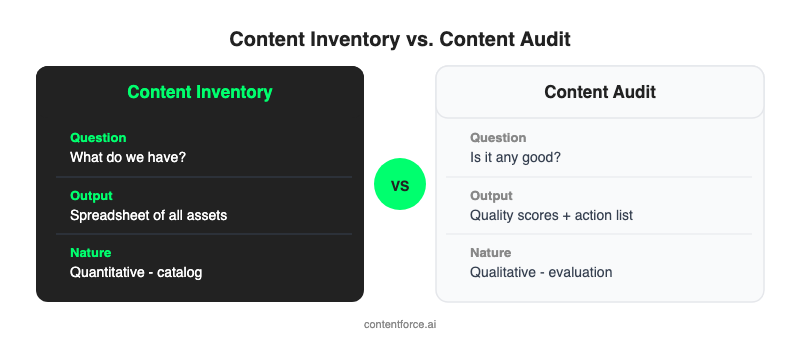
These two terms are often used interchangeably, but they describe different activities.
A content inventory is quantitative: it catalogs what exists. A content audit is qualitative: it evaluates whether what exists is good.
| Content Inventory | Content Audit | |
|---|---|---|
| Question it answers | What do we have? | Is it any good? |
| Output | Spreadsheet of all content assets | Quality scores, recommendations, action list |
| When done | First, as the foundation | After the inventory exists |
| Scope | Every asset | Can be a subset of high-priority pages |
| Skill needed | Systematic cataloging | Editorial judgment, SEO analysis |
Most projects start with an inventory and layer an audit on top. You cannot evaluate content quality at scale without first knowing what content you have.
For a deeper look at the audit layer, see the guide on what a content audit involves and how it builds on inventory data.
When Do You Need a Content Inventory?
Any situation that requires you to understand or restructure your site's content is a good trigger for a content inventory.
Website redesign or relaunch. Before you rebuild your site, you need to know what content exists, what migrates, what gets rewritten, and what gets retired.
CMS migration. Moving from WordPress to another platform (or vice versa) requires mapping every existing URL to a destination. A content inventory is the source of truth for that mapping.
Content gap analysis. To identify topics you have not covered, you first need to know what you have covered. An inventory prevents you from duplicating content you already have and reveals where the real gaps are. See also: content gap analysis.
Content governance initiative. If you are scaling a content team or bringing in new writers, an inventory tells them what already exists and who owns it, preventing duplicate content and establishing accountability.
SEO audit preparation. A technical SEO audit often surfaces indexation issues, redirect chains, and duplicate content. A content inventory gives you the full URL set to diagnose against.
Information architecture restructuring. Redesigning your site navigation or topic cluster structure requires knowing what content you are working with before you reorganize it.
New content manager onboarding. When someone new takes over a site, an inventory is the fastest way to give them a complete map of what they are responsible for.
What to Include in a Content Inventory (Fields to Track)
Not all inventories need every possible field. Start with the core fields and add SEO and governance fields once the foundation is in place.
Core Fields
Every content inventory should capture:
- Page URL: the canonical URL for the page
- Page title: the H1 or title tag, whichever is more descriptive
- Content type: blog post, landing page, product page, help article, case study, etc.
- Author or owner: who wrote it or who is responsible for it today
- Date published: when it first went live
- Date last updated: when it was most recently modified (Google uses this as a freshness signal; tracking it helps you identify content decay before rankings drop)
- Word count: approximate or exact; useful for identifying thin content
- Status: live, draft, archived, redirected
SEO Fields
For sites using the inventory for SEO purposes:
- Primary keyword: the main query the page targets
- Meta title and meta description: as currently live
- Organic traffic: monthly sessions from Google Analytics 4
- Impressions and average position: from Google Search Console
- Backlinks count: from Ahrefs or Semrush
- Indexation status: indexed / not indexed / canonicalized away
Governance Fields
For teams using the inventory as an operational document:
- Action needed: keep / update / merge / redirect / delete (see ROT framework below)
- Priority: high / medium / low
- Assigned to: which team member handles it
- Due date: when the action should be complete
- Notes: anything relevant that does not fit another column (commonly used to flag redirect dependencies, technical issues found during the crawl, or editorial context behind a decision)
You do not need to populate every field on day one. The goal is a working document, not a perfect one.
How to Create a Content Inventory, Step by Step
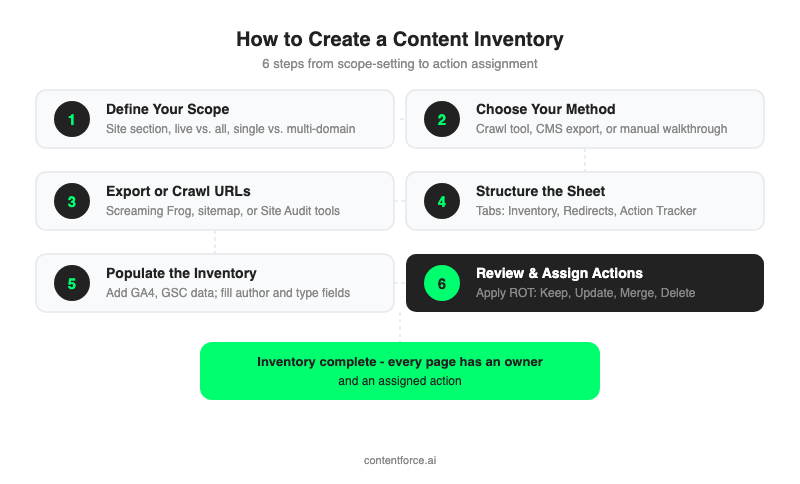
Step 1: Define Your Scope
Before you collect a single URL, decide what is in scope.
Full site vs. section. For a large site, inventorying everything at once is often impractical. Start with your highest-traffic sections or the area undergoing change (for example, just the blog, or just the product pages).
Live content only vs. everything. Decide whether you include drafts, archived pages, and redirected URLs or only live, indexable pages.
Multi-domain or single domain. If you manage multiple subdomains or related sites, decide whether they get separate spreadsheets or a combined one.
The narrower your initial scope, the more likely the inventory gets completed and actually used.
Step 2: Choose Your Method (Manual vs. Automated)
There are three approaches:
Automated crawl. Use a tool like Screaming Frog or Sitebulb to crawl the site and export all URLs with metadata. This takes minutes even for large sites and is the best starting point for any inventory over 100 pages. See also: Screaming Frog alternatives if cost or scale is a constraint.
CMS export. Many CMS platforms (including WordPress) let you export a list of all posts and pages with metadata. This is fast but often misses images, PDFs, and non-CMS assets.
Manual walkthrough. For small sites (under 50 pages), you can walk through the site by hand and log what you find. This is slow but gives you qualitative context alongside raw URL data.
For most projects, the right approach is to crawl first, then manually enrich the spreadsheet with fields the crawl tool cannot populate (author, action, priority, owner).
Step 3: Export or Crawl All URLs
With Screaming Frog (or a similar tool), run a full site crawl and export the results as a spreadsheet. At minimum, export:
- URL
- Page title
- Meta description
- Word count (if available)
- Response code (200, 301, 404, etc.)
- Indexation status (if crawling with JS rendering or via Google Search Console integration)
For sites using Semrush or Ahrefs, the Site Audit module can export a similar URL list with additional SEO signals already attached.
You can also parse your XML sitemap directly. Most CMS platforms generate a sitemap automatically. Parsing it gives you a clean list of all URLs the site intends to make indexable.
Step 4: Structure Your Spreadsheet
Open a new Google Sheet or Excel file and set it up before you start filling it in.
Recommended tab structure:
- Main Inventory: the primary URL list with all fields
- Redirects: pages that have been or need to be redirected
- Archived: pages removed from the live site but worth tracking
- Action Tracker: filtered view or separate sheet showing only items with assigned actions and due dates
In the Main Inventory tab, set up your column headers from the field lists above. Freeze the top row and add filters to every column. This makes sorting by content type, status, or assignee much easier once the data is populated.
Avoid adding more than 20 columns to start. Data paralysis, so many fields that nothing gets filled in, is the most common reason content inventories fail.
Step 5: Populate the Inventory
Work systematically. The most practical approach:
Paste the crawl export into the Main Inventory tab. This gives you URLs and basic metadata immediately.
Add GA4 traffic data using the Google Analytics export or a direct data connection. Match by URL.
Add Search Console data (impressions, average position) if you have access.
Manually fill in author, content type, action, and owner fields for each row or assign sections of the spreadsheet to team members who know that content best.
For large sites (1,000 or more pages), focus manual enrichment on the top 20 percent of pages by traffic first. The long tail of low-traffic pages can be handled in bulk using filters and batch actions.
Step 6: Review and Assign Actions
Once the data is in, review it and assign a fate to each page. Apply the ROT framework (described in the next section) to flag pages that need action. Mark each row with:
- Keep: no action needed; content is accurate, performing, and current
- Update: content is valuable but needs refreshing
- Merge: two or more pages cover the same topic and should be consolidated
- Redirect: the page should be replaced by another URL and a 301 redirect set up
- Delete: the page has no value and should be removed (with a redirect if it has backlinks)
Assign an owner and a due date to every row with an action. Without ownership, an inventory is just a document. With ownership, it becomes a work queue.
Content Inventory Template: What a Good Spreadsheet Looks Like
A well-structured content inventory spreadsheet has five tabs:
- Main Inventory: all live URLs with core, SEO, and governance fields
- Redirects: current or planned redirect mapping (from URL to URL, reason, date)
- Archived: pages removed from live but retained for reference
- Action Tracker: filtered view of rows with assigned actions, owners, and due dates
- GA4 Data: raw or aggregated export from Google Analytics for traffic data joining
For column headers in the Main Inventory tab, the minimum useful set is:
URL | Title | Content Type | Author | Date Published | Last Updated | Word Count | Status | Primary Keyword | Traffic (mo) | Action | Priority | Owner | Due Date | Notes
URL | Title | Content Type | Author | Date Published | Last Updated | Word Count | Status | Primary Keyword | Traffic (mo) | Action | Priority | Owner | Due Date | Notes
Paste into the first row of a Google Sheets or Excel file, one column per field.
Washington State University publishes a publicly available content inventory template using an 8-tab Google Sheets structure: Content, Start Here, Export URL, GA4 Data, Documents, Redirects, Updates, and Formulas. It is one of the most-cited free templates in content strategy communities.
Other free template sources:
- Google Sheets community templates (search for "content inventory" in the template gallery)
- Screaming Frog's export can serve as the base spreadsheet with minimal reformatting
Best Tools for Creating a Content Inventory
Screaming Frog SEO Spider. The most widely used crawl tool for content inventories. Free for up to 500 URLs; paid for larger sites. Exports URLs with titles, meta descriptions, word counts, response codes, and more. The fastest way to bootstrap a content inventory.
Semrush Site Audit. Crawls your site and surfaces SEO issues alongside URL data. Useful when you want crawl data and an SEO health report in the same pass.
Ahrefs Site Explorer. Provides a crawled page list with traffic estimates and backlink data. Good for content inventories that need to incorporate link equity signals from the start.
Sitebulb. A desktop crawler that generates richer visual reports than Screaming Frog. Well-suited for technical content inventories where visual output matters.
ContentKing (now Conductor). A continuous monitoring tool that keeps a live content inventory updated automatically as your site changes. Better for ongoing governance than one-time inventories.
Google Search Console plus GA4. Neither tool produces a full content inventory on its own, but both provide URL-level data (impressions, clicks, sessions) that you add to your spreadsheet as enrichment layers.
Notion or Airtable. After the raw data is collected, many content teams move the inventory into Notion or Airtable for ongoing team collaboration, filtering, and task assignment. Spreadsheets are faster to set up; databases are easier to maintain.
AI content tools. Newer AI-assisted platforms can automate the quality scoring layer, flagging thin content, outdated information, or content decay: on top of a completed URL inventory.
Blog Outline Generator: headings, key points and FAQ candidates for your topic. Free, no signup.
The ROT Framework: What to Do with Your Content After Inventorying It
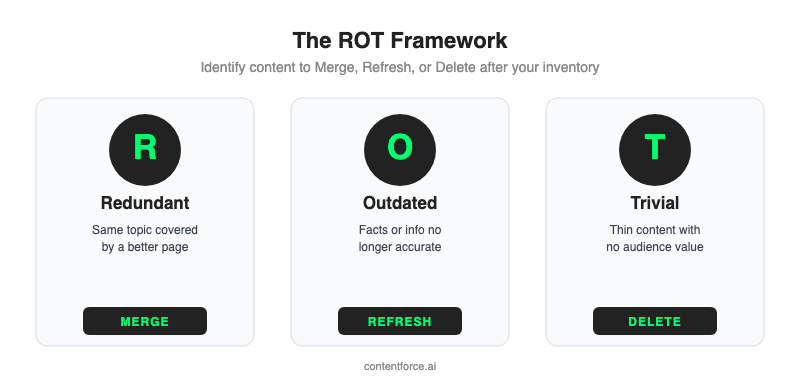
ROT stands for Redundant, Outdated, Trivial. It is a framework from the information architecture field for identifying content that is actively harming your site rather than helping it.
Redundant content covers a topic already addressed better by another page on the same site. Redundant content fragments your authority, can cause keyword cannibalization, and dilutes the topical signal you send to search engines. The fix is usually to merge or consolidate, pick the stronger page and redirect the weaker one to it.
Outdated content contains information that was accurate at publication but is no longer true: old product names, discontinued features, superseded statistics, or references to tools that no longer exist. Outdated content erodes trust and can cost you rankings when competitors have fresher answers. The fix is a content refresh to bring facts and structure up to date.
Trivial content exists but adds no meaningful value: pages with 200 words of thin coverage, pages that rank for nothing and convert nobody, internal process pages that were never meant to be public. Trivial content drags down crawl budget and dilutes site authority. The fix is removal (with a redirect if the URL has any links pointing to it) or consolidation with a related, meatier page.
How to apply ROT in your inventory
Add a column called ROT Flag to your spreadsheet. As you review each row, mark pages that match one or more ROT criteria. Then assign the appropriate action (merge, refresh, delete). Not every low-traffic page is ROT, some are legitimately niche and intentional. Apply ROT judgment based on whether the page serves a real audience need, not on traffic alone.
How to Assign Content Ownership in Your Inventory
The most common reason content inventories fail is not that they were built badly, it is that no one owned what happened after.
Content ownership means every page has a named person responsible for keeping it accurate, up to date, and aligned with business goals.
How to assign ownership in practice:
- By content type. Assign all blog posts to one team member, all landing pages to another, all help docs to a third.
- By topic cluster. Assign the full cluster (pillar plus supporting posts) to whoever manages that topic area. This works well for topical authority strategies where one person owns a subject end-to-end.
- By traffic tier. Your highest-traffic pages deserve a named owner who checks them quarterly. Lower-traffic pages can be reviewed on a lighter cadence.
Add an Owner column and a Review Date column to your Main Inventory tab. Set review dates staggered across the quarter so not everything comes due at once.
The content inventory becomes a governance system, not just a document, when ownership is assigned and review cycles are scheduled.
Common Content Inventory Mistakes to Avoid
Going too broad too fast. Trying to inventory 10,000 pages in one sprint leads to an incomplete spreadsheet that no one trusts. Start with one section, do it well, then expand.
Collecting data but never acting on it. An inventory without a review pass and action assignments is just a list. The value is in the decisions it enables. Block time to review the inventory within a week of building it.
Skipping non-HTML assets. PDFs, videos, and downloadable files are part of your content estate. If they rank, they have traffic. If they contain outdated information, they damage trust. Include them.
Leaving ownership blank. Every page that lacks an owner will eventually become outdated. Assign an owner, even a provisional one, before you call the inventory complete.
Treating it as a one-time project. Sites change constantly. New pages are published, old ones are deleted, URLs are restructured. An inventory built once and never updated becomes misleading within months. Plan for maintenance from day one.
Using too many columns. Twenty-column inventories rarely get fully populated. Start with ten essential fields. Add more only when you have consistently filled in the first set.
How to Keep Your Content Inventory Updated
A content inventory is a living document. Its value degrades fast if it is not maintained.
Practical cadence for most sites:
Quarterly review. Once per quarter, re-crawl the site and flag any new or changed URLs against the inventory. Update statuses, actions, and metadata for pages that have changed.
Trigger-based updates. Any time you publish a new page, restructure a section, or change a URL, update the inventory immediately rather than waiting for the quarterly pass.
Assign a content ops owner. Someone should own the inventory as a document, not just own individual pages within it. This is often a content strategist, SEO lead, or content operations manager.
Automate where possible. Tools like ContentKing can maintain a near-real-time version of your URL inventory automatically. Use automation for the data layer; reserve human judgment for the action and ownership columns.
The simplest rule: every time you change your site, ask whether the inventory reflects the change. If it does not, update it before moving on.
Frequently Asked Questions
What is a content inventory?
A content inventory is a complete, structured catalog of every content asset on a website, typically stored in a spreadsheet, documenting what exists, where it lives, who owns it, and its basic metadata.
What is the difference between a content inventory and a content audit?
A content inventory answers "what exists?" (quantitative catalog). A content audit answers "how good is it?" (qualitative evaluation). An inventory is usually done first; an audit may follow. Most SEO and content strategy projects use both together.
What should be included in a content inventory?
Every content inventory should track at minimum: page URL, title, content type, author or owner, publish date, last updated date, word count, and status. SEO-focused inventories also include primary keyword, traffic, indexation status, and backlink count.
How long does a content inventory take?
For a site with under 100 pages: a few hours with a crawl tool plus manual enrichment. For sites with 1,000 to 10,000 pages: typically two to five days for a small team. For sites with 50,000 or more pages: automated tools are essential and full manual enrichment is scoped to high-priority sections only.
What tools are best for creating a content inventory?
Screaming Frog is the most widely used starting point, it crawls your site and exports URLs with metadata. Semrush and Ahrefs add traffic and backlink data. For ongoing maintenance, ContentKing or Notion databases work well.