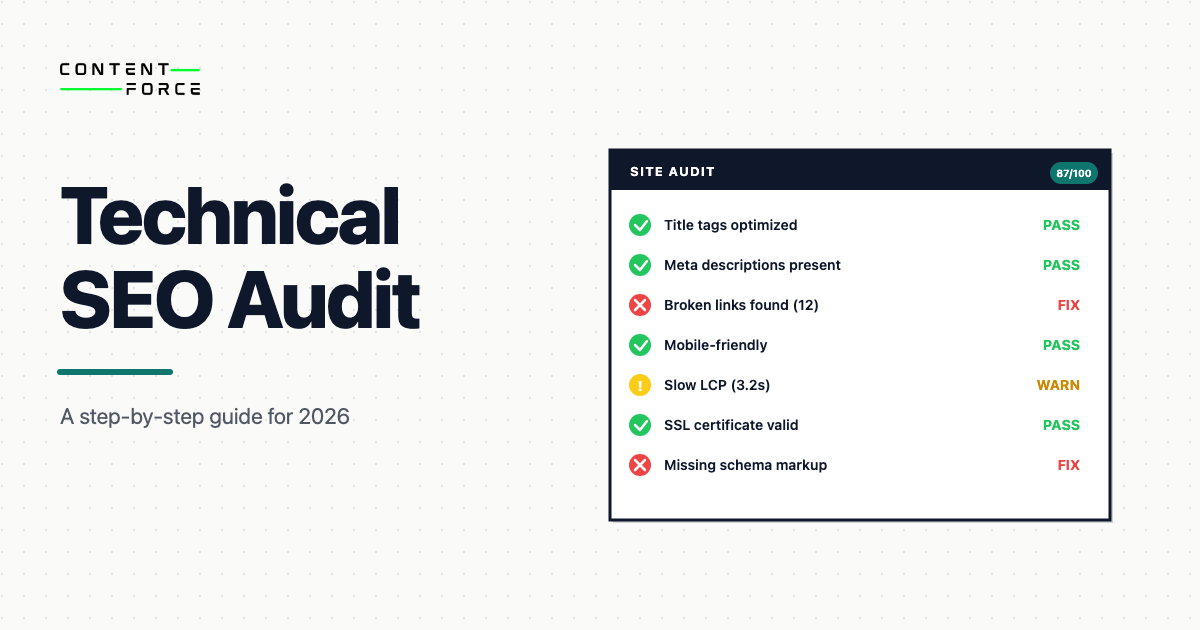
A technical SEO audit reviews a website’s technical infrastructure to find issues that stop search engines from crawling, indexing and ranking its pages. The audit uses tools like Google Search Console, Screaming Frog and Google PageSpeed Insights to systematically check crawlability, site architecture, Core Web Vitals and technical markup across 11 audit areas.
This is not a content audit or a backlink audit. It focuses on the underlying architecture. If your pages are well-written but Google still struggles to find them, the problem is almost always technical. This guide walks through every area a complete technical SEO audit covers, in the order you should work through them.
What Is a Technical SEO Audit?
A technical SEO audit is a comprehensive review of a website’s backend structure that checks whether search engines can crawl, index and render every page. It identifies “technical debt”: crawlability blocks, broken links, redirect chains, thin pages, mobile usability problems, indexation errors and security issues that prevent higher organic rankings and reduce the traffic your site should be getting.
The audit covers three core areas:
- Crawlability and indexation: checking robots.txt rules, XML sitemaps and crawl error reports to confirm search engines can access and catalog your pages
- Website structure and security: reviewing URL structure, internal linking, site depth and HTTPS/SSL certificate validity
- Page speed and Core Web Vitals: measuring LCP, INP and CLS performance and identifying the specific issues holding back load times
The goal is to find issues before they erode rankings, diagnose problems after a traffic drop or confirm a site is in good shape before a migration or major change. Most technical issues are invisible in normal browsing. You’ll only find them by running a structured audit with the right tools.
Technical SEO Audit vs. Full SEO Audit
The two overlap but they’re not the same. A technical SEO audit is scoped to infrastructure. A full SEO audit extends that scope to content and backlinks.
| Area | Technical SEO Audit | Full SEO Audit |
|---|---|---|
| Crawlability and indexation | Yes | Yes |
| Site speed and Core Web Vitals | Yes | Yes |
| Technical markup (canonical, hreflang, schema) | Yes | Yes |
| Status codes and redirects | Yes | Yes |
| Content quality and relevance | No | Yes |
| Keyword research and gaps | No | Yes |
| Backlink profile | No | Yes |
A technical audit focuses on whether search engines can reach and understand your content. A full SEO audit adds whether the content itself is worth ranking, including content gap analysis and backlink evaluation. Run a technical audit first. There’s no point improving content if Google can’t index it.
What Tools Do You Need for a Technical SEO Audit?
Four tools handle the core technical audit workflow: Google Search Console for crawl data and indexation, Screaming Frog SEO Spider for full-site crawling (free up to 500 URLs), Google PageSpeed Insights for Core Web Vitals and performance, and Ahrefs or Semrush for automated site health scoring. No single tool covers everything. Use them in combination.
Free Tools
- Google Search Console: the most important free tool for a technical audit. Shows crawl errors, coverage issues, Core Web Vitals field data, mobile usability problems and manual penalties. If you only use one tool, use this one.
- Google PageSpeed Insights: runs Lighthouse against a URL and reports Core Web Vitals field data alongside lab scores. Shows specific elements causing LCP, INP or CLS problems.
- Chrome DevTools: for diagnosing JavaScript rendering issues, checking response headers and inspecting structured data implementation. The Network and Console tabs are the most useful for technical auditing.
- Ahrefs Webmaster Tools: free for verified site owners. Provides site audit reports covering missing tags, duplicate content, redirect chains and broken links. Useful for a second crawl perspective alongside Screaming Frog.
Paid Tools
- Screaming Frog SEO Spider: the standard tool for full site crawls. Finds broken links, redirect chains, duplicate titles, missing meta descriptions, thin pages and orphan pages. Free tier covers up to 500 URLs. The paid license enables JavaScript rendering, scheduled crawls and log file integration for larger sites.
- Ahrefs Site Audit or Semrush Site Audit: cloud-based crawlers that schedule recurring audits and track issues over time. Useful when you want to monitor a site continuously rather than run a one-off crawl. Both score overall site health and categorise issues by severity.
- Screaming Frog Log File Analyser: reads server access logs to show exactly how Googlebot crawls your site. Separate from the SEO Spider. Pairs directly with the SEO Spider crawl to compare what you expect Googlebot to crawl versus what it actually crawls.
For most audits, Google Search Console plus Screaming Frog covers the critical ground. Add PageSpeed Insights for performance and the Log File Analyser if you have access to server logs.
How to Do a Technical SEO Audit (Step by Step)
A technical SEO audit covers 11 areas in a set sequence: start with crawlability and indexation using Screaming Frog and the Google Search Console Coverage report, move through site structure, internal links, duplicate content, page speed, mobile usability and technical markup, then finish with status codes, server logs and AI crawler access. Each area builds on the previous. You’ll waste effort fixing performance before you’ve sorted crawl blocks.
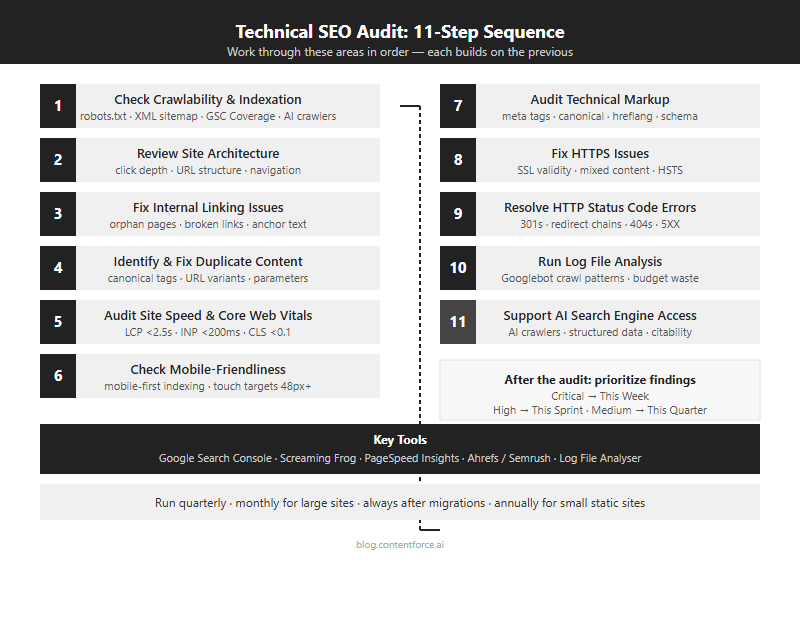
Step 1: Check Crawlability and Indexation
Before anything else, confirm that Google can find your pages and include them in its index. Crawlability problems are the most severe technical issues. They prevent all other ranking signals from taking effect. A site with perfect content and strong backlinks still won’t rank if Googlebot can’t reach it.
Audit Your Robots.txt File
The robots.txt file tells crawlers which parts of your site they can and can’t access. It lives at the root of your domain (yoursite.com/robots.txt) and must return a 200 status code when fetched. It only controls crawling, not indexation. A page can be indexed even if its crawling is blocked, as long as another page links to it.
Check it for:
- A global
Disallow: /rule that would block all crawlers from the entire site, a common mistake when staging environments are deployed to production - Rules that accidentally block important directories like
/blog/,/products/or your main content folders - Rules that block CSS or JavaScript files Google needs to render your pages correctly
- A link to your XML sitemap, which most crawlers expect to find here
Use Google Search Console’s robots.txt tester (under Settings) to see what Google reads and to flag syntax errors. Test each Disallow rule by hand before assuming it works as intended. Robots.txt syntax errors are more common than most teams expect.
Check Your XML Sitemap
Your XML sitemap should list every URL you want Google to index. It must be reachable, return a 200 status code and stay under 50,000 URLs and 50MB uncompressed per file. Larger sites can split sitemaps and reference them from a sitemap index file. The sitemap is not a guarantee of indexation, but it accelerates discovery of new and updated pages.
Check for:
- URLs that return 404 or redirect to different pages
- Pages marked with
noindexappearing in the sitemap (these conflict; a page should not be in both places) - Duplicate URLs with and without trailing slashes
- Outdated URLs that no longer exist on the site
Submit your sitemap in Google Search Console under Sitemaps, then check the coverage report for any rejected URLs. A high proportion of “submitted but not indexed” pages in Search Console often points to a sitemap quality problem or a content quality signal.
Find Crawl Errors in Google Search Console
The Coverage report shows which pages Google has indexed, which it has excluded and why. Look for pages in the “Excluded” category with reasons like:
- Crawled but not indexed: Google found the page but chose not to index it. Often a content quality or duplication signal.
- Blocked by robots.txt: check whether this was intentional. Unexpected blocks here often point to a configuration error.
- Noindex tag: confirm these pages should be excluded. Noindex tags left on pages after staging is a common cause of missing indexation.
- Redirect error or soft 404: pages that return 200 but serve thin or empty content Google interprets as “not found”.
Cross-reference your Coverage exclusions with your sitemap submissions to identify mismatches. Pages in your sitemap that are also appearing in the “Excluded” list need investigation.
Review AI Crawler Access
As of 2026, AI search engines including Google AI Mode and ChatGPT have their own crawlers that operate independently of Googlebot. You can allow or block them using robots.txt user-agent directives.
The main AI crawler identifiers are:
GPTBot: OpenAI’s training and retrieval crawlerClaudeBot: Anthropic’s crawlerGoogle-Extended: Google’s crawler for Gemini model training (separate from Googlebot)
If you want AI systems to cite your content in AI-generated answers, allow these crawlers. If you want to opt out of AI training while staying in standard search, block GPTBot and Google-Extended but keep Googlebot unrestricted. Document the decision in your robots.txt comments so it stays intentional. For a deeper look at how AI visibility works, see our guide to AI visibility.
Step 2: Review Site Architecture
Site architecture is about how pages are organised and linked together. Good architecture keeps your important pages close to the homepage so crawlers reach them quickly and link equity flows through the site efficiently. Poor architecture means important pages get crawled infrequently and receive little internal authority.
Site Hierarchy and Click Depth
Your important pages should be reachable within three clicks from the homepage. Pages buried deeper receive less crawl budget and fewer internal links, which weakens their authority signals. The three-click rule is a guideline, not an absolute limit, but any important page beyond four clicks is worth investigating.
To check click depth, crawl your site with Screaming Frog and look at the “Crawl Depth” column. On a smaller site, pages at depth four or higher often indicate a structural problem worth fixing. On a large site, depth four is reasonable for category and product pages, but depth six or higher signals orphaned content.
URL Structure and Slugs
Clean URLs are short, use hyphens to separate words and contain no unnecessary parameters. Keep URLs under 2,000 characters. Avoid folder structures deeper than four levels. URLs that describe the page topic help both users and crawlers understand what a page covers before they visit it.
Avoid URLs that include:
- Session IDs or dynamic parameters in the public URL
- Uppercase letters (URLs are case-sensitive; capitalisation inconsistencies create duplicate pages)
- Special characters or spaces
- Dates in the path unless the content is genuinely time-indexed news
Navigation Review
Check that your main navigation links to your most important pages. Navigation links are crawled early on every page and pass authority across the entire site. A key page with no internal links and absent from the navigation is invisible to crawlers regardless of how good the content is. Review both your header navigation and any footer or sidebar link structures that appear globally across the site.
Step 3: Fix Internal Linking Issues
Internal links distribute PageRank across your site and signal to Google which pages matter most. A page with strong content but no internal links pointing to it receives almost no internal authority, which limits how well it can compete for rankings regardless of its content quality.
Find Orphan Pages
Orphan pages have no internal links pointing to them. Google can still find them through the sitemap, but they receive no link equity and are crawled infrequently. Run a crawl in Screaming Frog and cross-reference the results with your sitemap to find pages that appear in the sitemap but are absent from the crawl’s internal link graph. These are your orphan candidates.
Fix orphan pages by identifying the most relevant existing pages and adding contextual links from those pages. The link should use anchor text that describes the orphan page’s primary topic. Don’t just link from the navigation – contextual in-content links carry more weight.
Fix Broken Internal Links
Broken internal links waste crawl budget and create a frustrating user experience. In Screaming Frog, filter by “Response Codes” and look for internal links returning 404. Update them to point to the correct live URL or the nearest relevant page. Prioritise broken links on high-traffic pages and pages with many internal links pointing to them.
Improve Anchor Text
Anchor text tells Google what a linked page is about. Generic anchors like “click here” or “read more” give Google no topical signal. Use descriptive, keyword-relevant anchors that reflect the destination page’s topic. Vary the phrasing – over-optimised anchor text that uses the exact same phrase repeatedly can look manipulative and trigger penalties.
Step 4: Identify and Fix Duplicate Content
Duplicate content means the same or very similar content is accessible at multiple URLs. It dilutes link equity, wastes crawl budget and can prevent Google from indexing the right version of your pages. It’s also a common trigger of keyword cannibalization, where multiple pages compete for the same search intent and split the authority that should be consolidated on one page.
Google doesn’t penalise sites for having duplicate content, but it does have to make a choice about which version to show. That choice may not be the one you want.
Multiple URL Versions of the Same Page
A single page often has several accessible URL variations that all return 200 and serve the same content:
http://example.com/pagevs.https://example.com/pagewww.example.com/pagevs.example.com/pageexample.com/pagevs.example.com/page/(trailing slash difference)example.com/page?ref=123(UTM or tracking parameters)
All non-canonical variants should 301 redirect to a single canonical URL. Check that the chosen canonical uses HTTPS and is listed consistently in your sitemap. Use Screaming Frog to crawl your site and identify pages served at multiple URL variations simultaneously.
URL Parameters and Faceted Navigation
Faceted navigation on ecommerce and filter-heavy sites creates parameter-based URLs that contain no unique content. These consume crawl budget without generating ranking value. Use the URL Parameters tool in Google Search Console to tell Google how to handle them, or block them in robots.txt if they should never be indexed. For complex parameter structures, consider consolidating filtered views behind a single canonical URL.
Canonical Tag Implementation
The canonical tag (rel="canonical") signals to Google which URL is the preferred version of a page. It’s a hint, not a hard directive, but a correctly implemented canonical significantly reduces the risk of Google indexing the wrong version. Canonicals should be absolute URLs, not relative ones.
Check for:
- Self-referencing canonicals on all indexable pages (each page should point to itself as the canonical)
- Canonicals pointing to redirecting or broken URLs
- Conflicting canonicals (one in the HTML head and a different one in the HTTP header; the HTTP header takes precedence)
- Paginated content where all pages incorrectly point to page one as the canonical, which signals to Google to deindex all but the first page
Step 5: Audit Site Speed and Core Web Vitals
Core Web Vitals are Google’s primary performance signals. They measure how fast content loads, how quickly a page responds to input and how stable the layout is during loading. Poor scores affect rankings and drive users away before they engage with your content. Google uses field data from real Chrome users for ranking decisions, not just lab scores from Lighthouse.
The current Core Web Vitals thresholds (detailed technical guidance at web.dev):
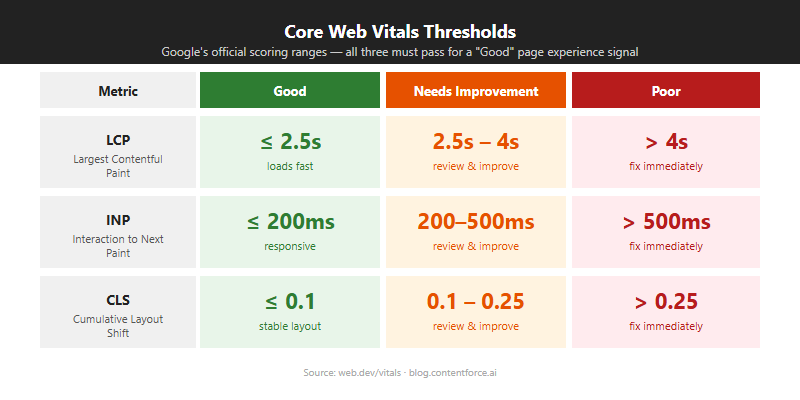
| Metric | Good | Needs Improvement | Poor |
|---|---|---|---|
| Largest Contentful Paint (LCP) | Under 2.5s | 2.5–4s | Over 4s |
| Interaction to Next Paint (INP) | Under 200ms | 200–500ms | Over 500ms |
| Cumulative Layout Shift (CLS) | Under 0.1 | 0.1–0.25 | Over 0.25 |
INP replaced First Input Delay (FID) as a Core Web Vital in March 2024. FID only measured the delay before the browser responded to the first interaction. INP measures the full latency of all interactions throughout the page lifecycle, making it a stricter and more comprehensive signal. Pages that passed FID may still fail INP if they have heavy JavaScript running after initial load.
Largest Contentful Paint (LCP)
LCP measures how long it takes your largest visible element to fully load. For most pages, that’s a hero image or a large heading block. An LCP above 4 seconds puts a page in “poor” territory and is a direct ranking risk. Google PageSpeed Insights shows which specific element is your LCP element and why it’s slow.
Common LCP fixes:
- Serve images in next-gen formats (WebP or AVIF) to reduce file size without visible quality loss
- Add a
fetchpriority="high"attribute to the LCP image so the browser loads it before other resources - Use a CDN (such as Cloudflare) to reduce server response time for users far from your origin server
- Preload the LCP image in the document head with
<link rel="preload">so it starts loading immediately
Interaction to Next Paint (INP)
A page with heavy JavaScript that freezes after button clicks or menu interactions will score poorly on INP even if the initial load is fast. INP failures often appear on pages with third-party scripts, complex React or Vue components, or heavy analytics implementations.
Common INP fixes:
- Break up long JavaScript tasks (tasks over 50ms block the main thread and create interaction delays)
- Defer non-critical JavaScript until after the page is interactive
- Avoid layout thrashing caused by reading and writing DOM properties in quick succession
- Audit third-party scripts; each additional tag (analytics, chat, ads) adds main-thread pressure independently
Cumulative Layout Shift (CLS)
CLS measures how much your page layout shifts during and after loading. Text that jumps as images load, ads that push content down or embeds that resize unexpectedly all contribute to a high CLS score. A CLS above 0.25 is poor and often leads to users clicking the wrong element because the layout moved under their cursor.
Common CLS fixes:
- Always set explicit width and height attributes on images and video elements so the browser reserves the right space before they load
- Reserve space for ad slots and third-party embeds before they load, even if that space looks empty during load
- Avoid injecting content above existing content after the initial render
How to Fix Common Speed Issues
Run your pages through Google PageSpeed Insights or Lighthouse in Chrome DevTools to get a prioritised list of opportunities. Fix the highest-impact items first, not the easiest ones.
Issues that consistently appear on slow sites:
- Uncompressed or oversized images (compress before uploading; use lazy loading for below-the-fold images)
- Render-blocking scripts (move to the bottom of the body or add the
deferattribute) - No browser caching for static assets (set long cache-control headers for images, CSS and JS)
- Too many third-party scripts; each analytics tag, chat widget and ad tracker adds latency independently
Step 6: Check Mobile-Friendliness
Google uses mobile-first indexing for all sites. Google primarily uses your mobile pages to determine rankings, even for desktop searches. If your mobile version is thinner, slower or harder to navigate than the desktop version, your rankings reflect the mobile experience, not the desktop one.
Test Mobile Usability in Google Search Console
The Mobile Usability report in Google Search Console lists all pages with usability problems. Common issues include:
- Text too small to read: body text should be at least 16px to be readable on mobile without zooming
- Clickable elements too close together: touch targets should be at least 48px with adequate spacing between them to prevent accidental taps
- Content wider than screen: caused by fixed-width elements that overflow on small screens, requiring horizontal scrolling
- Missing viewport meta tag: without
<meta name="viewport" content="width=device-width, initial-scale=1">, mobile browsers render a desktop-width layout at reduced scale
Confirm your mobile version has the same content as the desktop version. Google won’t rank content that only appears on the desktop layout. This is a common trap with lazy-loading implementations that hide content on mobile.
Step 7: Audit Technical Markup
Technical markup covers the code-level signals that affect how Google reads, interprets and displays your pages in search results. Errors here won’t always prevent indexing, but they reduce your control over how the page appears in search results and how much information search engines can reliably extract from it.
Meta Titles and Meta Descriptions
Meta titles are the strongest on-page ranking signal after the content itself. Keep them under 60 characters to avoid truncation in search results. Each title should be unique, include the primary keyword and describe the page accurately. Duplicate titles across multiple pages confuse Google about which page to rank for a given query.
Meta descriptions aren’t a direct ranking factor, but they’re what appears in your search snippet and they directly affect click-through rates. Keep them between 120 and 155 characters. In Screaming Frog, check for missing titles, duplicate titles across multiple pages and titles exceeding 60 characters. Also flag meta descriptions that are either missing entirely or duplicate across pages.
Canonical Tags
Every indexable page should have a canonical tag pointing to its preferred URL. Self-referencing canonicals confirm to Google that the page is the authoritative version. Check that all canonical URLs use HTTPS, match the URL version in your sitemap and don’t redirect. A canonical pointing to a URL that 301 redirects to a third URL creates a chain that reduces Google’s confidence in the signal.
Hreflang Tags
If your site serves multiple languages or regions, hreflang attributes tell Google which version of a page to show in each country or language context. This affects which version of your site appears to which users in search results. Common mistakes:
- Non-reciprocal tags (if Page A points to Page B in German, Page B must point back to Page A in English)
- Wrong language or region codes (use BCP 47 format:
en-US, notenglishoren_us) - Hreflang tags pointing to pages that return 404 or redirect
JavaScript Rendering Issues
If your pages generate important content with JavaScript, Google needs to render that JavaScript to see it. Google does render JavaScript, but there’s often a delay between first crawling a URL and completing a full render. Content that only appears after JavaScript executes may be indexed late, or not indexed at all if rendering fails due to resource constraints.
Use the URL Inspection tool in Google Search Console to request a live fetch and view the rendered HTML Google actually sees. If key headings, body text or internal links appear in the browser but not in Google’s rendered version, JavaScript is the blocker. The fix is usually to move critical content into server-side rendered HTML.
Structured Data and Schema Markup
Structured data uses Schema.org vocabulary to tag content so search engines understand what a page covers at a machine-readable level. It’s one of the clearest signals you can give search systems about what your content contains, and a key component of answer engine optimization.
Common schema types for editorial content:
ArticleorBlogPosting: for standard articles and guides; includes author, datePublished and publisherFAQPage: for FAQ sections; Google may display individual Q&A pairs directly in the SERP as rich resultsHowTo: for step-by-step guides; enables rich results on qualifying queries that show the steps inlineBreadcrumbList: helps Google understand site hierarchy and displays breadcrumbs in search results below the title
Use JSON-LD format rather than Microdata. Validate all schema with Google’s Rich Results Test and fix any errors before publishing. Structured data errors don’t typically affect indexation, but they prevent eligibility for rich results.
Step 8: Fix HTTPS Issues
HTTPS has been a Google ranking signal since 2014 and is now mandatory for competitive rankings. Sites still serving pages over HTTP should migrate immediately. Browsers display “Not Secure” warnings on HTTP pages, which reduces user trust and click-through rates regardless of ranking effects.
Check SSL Certificate Validity
An expired or misconfigured SSL certificate triggers browser security warnings that stop visitors before they’ve even reached your content. Check that your SSL certificate is valid and set to auto-renew. Most hosting providers handle this automatically with Let’s Encrypt, but verify the expiry date in your browser or via an SSL checker. A certificate that auto-renewed incorrectly or failed to renew silently is one of the most damaging overnight technical events a site can experience.
Resolve Mixed-Content Warnings
Mixed content occurs when your HTTPS page loads resources (images, scripts or stylesheets) over HTTP. Browsers will block or warn about these resources, sometimes silently. Open Chrome DevTools while loading key pages and look for “Mixed Content” errors in the Console tab. Update resource URLs to HTTPS or use protocol-relative URLs where the scheme can be inherited.
Also confirm that all HTTP versions of your pages 301 redirect to HTTPS, and that non-www redirects consistently to www (or the reverse). Implement HSTS headers to prevent browsers from requesting the HTTP version going forward. HSTS eliminates the window of vulnerability between a user requesting HTTP and the redirect completing.
Step 9: Resolve HTTP Status Code Errors
Status codes tell crawlers and browsers how to handle each URL. A clean status code profile means every URL on your site returns an appropriate response – 200 for live pages, 301 for permanent moves, 404 for genuinely missing pages. Incorrect or excessive errors waste crawl budget, break user journeys and leak link equity that was pointing at dead URLs.
3XX Redirect Issues
A 301 redirect signals a permanent move and passes link equity to the destination. A 302 signals a temporary move and doesn’t reliably pass equity. Review all redirects across your site and confirm:
- All permanent moves use 301s, not 302s; CMS migrations and URL restructures often default to 302
- No redirect chains: URL A redirecting to URL B which redirects to URL C. Each hop reduces the equity passed and increases load time. Flatten all chains to direct single-step 301s.
- No redirect loops: URL A redirects to URL B which redirects back to URL A. Both crawlers and browsers give up after detecting a loop. This often happens when HTTPS redirect rules conflict with www/non-www redirect rules.
4XX Errors (404 and 410)
A 404 means the server couldn’t find the requested URL. A 410 means the resource is permanently deleted. Use 410 intentionally when you’ve removed content and want Google to deindex it faster than a standard 404; 410s are typically processed faster by Googlebot.
For each 404, decide:
- Does a relevant live page exist? Redirect with a 301 to preserve any equity.
- Did the page have external links pointing to it? Redirect to the closest relevant live content to recover that equity.
- Was the page removed with no equivalent? Return 404 or 410 and leave it Do not redirect to an unrelated page.
In Screaming Frog, filter by 4XX response codes and export the list with the referring page. Prioritise 404s that are linked from other pages on your site or have inbound external links pointing to them. A 404 with no inbound links has minimal impact; a 404 receiving dozens of external links is actively losing equity every day it’s not fixed.
5XX Server Errors
A 5XX error means the server failed to handle the request. A 500 is a general server error. A 503 means the server is temporarily unavailable. A 504 is a gateway timeout, often caused by a slow backend or overloaded server.
5XX errors on important pages are urgent. Google can’t index a page it can’t reach, and repeated 5XX responses cause Google to reduce its crawl rate for the entire site; a pattern visible in log files before it appears in Search Console. Check your server error logs to identify the root cause and fix it before it becomes a sustained pattern. Intermittent 5XX errors from traffic spikes may require infrastructure changes rather than just code fixes.
Step 10: Run Log File Analysis
Log files record every request made to your server, including all requests from Googlebot. They tell you how often Google actually crawls each page, which areas it visits most frequently, which it ignores and whether it encounters errors during crawling that don’t appear in Search Console immediately. Log data is raw and unfiltered – nothing is averaged or delayed.
Log analysis is the only way to see what Google actually does on your site, rather than what you’d assume based on your sitemap and robots.txt settings.
What to Look for in Log Files
Download server access logs from your hosting provider or web server and use Screaming Frog Log File Analyser to parse them. Look for:
- Crawl frequency by page: are your highest-priority pages crawled frequently, or is Googlebot spending most of its budget on low-value URLs like parameter pages or admin sections?
- Wasted crawl budget: parameter URLs, faceted navigation or duplicate pages being crawled heavily that shouldn’t be
- Uncrawled important pages: pages in your sitemap that Googlebot hasn’t visited recently despite being high-priority content
- Crawl rate trends: a sudden drop in crawl frequency can signal that Google has reduced trust in the site following errors or quality issues
- Real-time 4XX and 5XX errors: logs catch errors as they happen, before they appear in Search Console’s delayed reporting
Log analysis is most valuable on large sites where crawl budget limits how often pages get refreshed. For smaller sites under a few thousand pages, Search Console and a site crawl usually provide enough insight without the complexity of log file processing.
Step 11: Support AI Search Engine Access
AI Overviews and other AI-powered search engines now surface answers on the majority of informational queries. How well your technical setup supports these systems affects your visibility beyond traditional blue-link rankings. The technical requirements overlap almost entirely with standard SEO good practice; fast pages, clean HTML, structured data and accessible content all apply equally.
Make Content Crawlable by AI Systems
AI search engines either crawl the web independently or draw from Google’s index. Your robots.txt rules and page rendering must support the access you want. Check that:
- Your robots.txt allows the AI crawlers you want to reach your content (see Step 1 for the relevant user-agent identifiers)
- Important content isn’t hidden behind JavaScript that AI crawlers may not fully render
- Pages load quickly enough to be reliably crawled on a regular schedule
- Your sitemap includes your most informational, citable pages; these are the ones most likely to be cited in AI responses
Use Structured Data to Improve Citability
Structured data is the clearest technical signal you can give AI search systems about what your content covers. Pages with correct FAQPage, HowTo or Article schema markup are easier for AI engines to parse and more likely to be cited in AI-generated answers. See our guide on LLM SEO for a full breakdown of optimising for AI search.
Structure your content so individual sections answer specific questions directly. An H2 heading followed by a direct answer sentence, before any lists, tables or qualifications, matches the extraction pattern that AI search systems prefer. Combine technical readability with editorial structure for the strongest presence in AI-powered results.
How to Prioritize Your Technical SEO Audit Findings
Prioritize technical SEO audit findings by assessing the impact on search visibility versus the effort to fix. Focus first on critical errors that prevent indexing or user access, then move to ranking-factor issues, then clean up lower-priority items in scheduled maintenance cycles. A three-tier system keeps the work manageable and ensures urgent issues don’t get queued behind cosmetic ones.
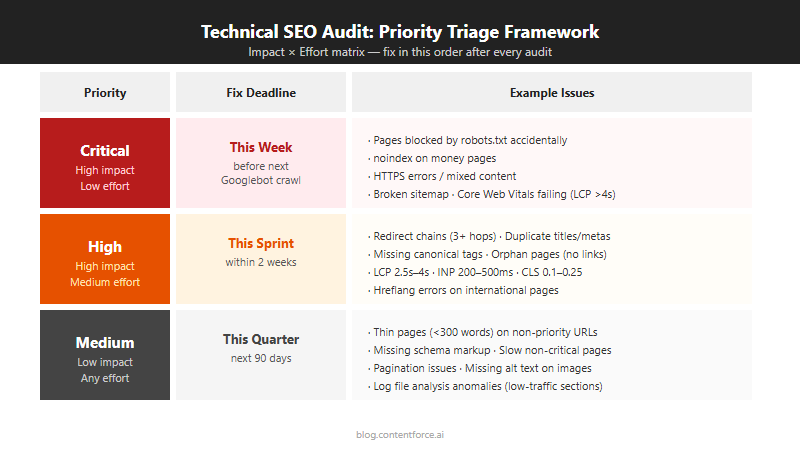
Critical Issues (Fix This Week)
These issues prevent Google from accessing or indexing your site correctly. Fix them before anything else. Each one has the potential to cause a complete loss of organic traffic from the affected pages.
| Issue Type | Why It’s Critical |
|---|---|
| Global Disallow in robots.txt | Blocks all crawling; no pages can be indexed |
| HTTPS not working or SSL expired | Browser warnings prevent users reaching the site; Google downgrades rankings |
| 5XX server errors on key pages | Pages are unreachable; crawl budget is consumed by errors instead of content |
| Sitemap returning 404 | Google can’t discover new or updated pages efficiently |
| Redirect loop on the homepage | Homepage is inaccessible; the entire site is effectively unranked |
| Noindex tag on key pages left from staging | Pages are explicitly excluded from the index; they will not rank |
High-Priority Issues (Fix This Sprint)
These directly affect rankings and organic traffic. Core Web Vitals failures and mobile usability problems are ranking factors. Canonical errors and duplicate title tags create confusion about which page to rank for a given query. Address these within the current two-week or monthly work cycle; they are not emergencies, but they’re costing you traffic every week they go unfixed.
- Core Web Vitals failures (especially LCP and INP on your highest-traffic pages)
- Canonical tag errors pointing to wrong or redirected URLs
- Large numbers of 404 errors on internally linked pages or pages with external backlinks
- Duplicate title tags across multiple pages
- Mobile usability failures flagged in Search Console
- Pages blocked by robots.txt that should be indexed
- Important pages missing from the XML sitemap
Medium-Priority Issues (Fix This Quarter)
These reduce efficiency and limit your site’s full potential, but they rarely cause immediate traffic drops on their own. Scheduling these in a quarterly technical maintenance cycle keeps your site healthy without disrupting ongoing content or product work.
- Redirect chains (flatten to direct 301s to reduce load time and equity loss)
- Orphan pages (add internal links from relevant content to distribute authority)
- Log file signals showing wasted crawl budget on low-value URLs
- Hreflang errors on international sites (affect ranking accuracy by region, not overall indexation)
- Structured data warnings and missing schema types
- Missing or thin meta descriptions (affect click-through rates, not rankings directly)
Technical SEO Audit Checklist
Use this checklist to track your progress through each audit area. Work through it in order since crawlability issues must be resolved before other fixes will have their full effect.
Crawlability and Indexation
- robots.txt reviewed; no important directories accidentally blocked
- XML sitemap exists and is submitted in Google Search Console
- Sitemap contains only indexable, live pages (no 4xx, no noindex pages)
- No important pages have unintentional noindex tags
- Crawl budget reviewed for sites with 1,000 or more pages
Site Architecture and Security
- Key pages reachable within 3 clicks from homepage
- URL format is lowercase and hyphen-separated with no unnecessary parameters
- HTTP redirects to HTTPS across the entire site
- No mixed-content warnings (HTTP resources on HTTPS pages)
- www and non-www versions canonicalized consistently
Duplicate Content
- All pages have a self-canonical tag or a correct canonical pointing to the preferred URL
- Paginated pages handled correctly
- No near-duplicate product variant pages without canonicals
- Thin content identified and scheduled for expansion or removal
Core Web Vitals and Speed
- LCP is under 2.5 seconds on key pages (mobile)
- CLS is under 0.1 on key pages
- INP is under 200ms on key pages
- Hero images use WebP format with explicit width and height attributes
- Render-blocking JavaScript deferred or eliminated on key pages
Mobile
- Viewport meta tag present on all pages
- Tap targets are at least 48x48px with adequate spacing
- Base font size is 16px or larger on mobile
- Mobile Core Web Vitals passing in Google Search Console
Internal Linking
- No orphan pages (pages with zero internal links)
- Most important pages are within 2-3 clicks from homepage
- Internal links use descriptive, keyword-relevant anchor text
- No internal links pointing to 4xx pages
Structured Data
- Article or BlogPosting schema on all blog posts
- FAQ schema on pages with question-and-answer sections
- BreadcrumbList schema implemented and validated
- Organization schema on homepage
- All schema validated in Google’s Rich Results Test with no errors
Redirects and Status Codes
- No redirect chains of more than one hop
- No redirect loops
- All 4xx pages either restored or redirected to the best equivalent
- High-backlink 404s redirected to preserve link equity
- No internal links pointing to redirected URLs (update to point to final destination)
How Often Should You Run a Technical SEO Audit?
Run a full technical SEO audit every quarter for most active websites. Quarterly audits catch regressions from plugin updates, content changes and Google algorithm changes before they cause sustained traffic losses. Large e-commerce sites or sites updated frequently need a crawl-level check monthly to catch new 404s and Core Web Vitals regressions quickly. Small, static or rarely updated sites can run a full audit annually, since their technical foundation changes slowly and quarterly audits would rarely surface new issues.
After Site Migrations and Redesigns
Always run a full technical audit immediately after a site migration, redesign or major CMS change. These events are the most common cause of sudden ranking drops. Even well-planned migrations introduce redirect errors, lost canonical tags, broken internal links and robots.txt changes that weren’t caught during staging.
Run the audit within 48 hours of launch. The faster you identify and fix migration errors, the less ranking damage accumulates before Google re-evaluates the site. For sites that run regular content refreshes, add a quick technical check to your refresh workflow to catch issues introduced by template or plugin updates. A 30-minute crawl after each major deployment is faster than recovering from a week of lost traffic.
Other triggers for an unscheduled audit:
- A sudden unexplained traffic drop that isn’t explained by seasonal patterns or a known Google update
- A Google algorithm update that correlates with a traffic change on your site
- After switching hosting providers or CDN configurations
- After adding a new CMS plugin or JavaScript framework that changes how pages render
Technical SEO Audit FAQ
How long does a technical SEO audit take?
For a small site with fewer than 500 pages, plan for one to two days for a thorough audit. For a medium-sized site between 500 and 5,000 pages, budget three to five days. Large enterprise sites with tens of thousands of pages take one to two weeks, especially if log file analysis and JavaScript rendering checks are included. Audit time scales primarily with page count, not site complexity.
How much does a technical SEO audit cost?
A DIY audit using free tools plus a paid Screaming Frog license typically runs $0–$300. Freelance SEO specialists charge an estimated $300–$2,000 for a standard audit of a small to medium site. Agency audits benchmark at $2,000–$10,000 or more for larger sites, with enterprise work often exceeding that range. Actual costs vary by scope, deliverables, site size and the specific consultant or agency. A more expensive audit doesn’t always mean more actionable findings.
What is the difference between a technical SEO audit and an on-page SEO audit?
A technical audit reviews how search engines access and interpret your site: crawlability, server configuration, page speed, markup and architecture. An on-page audit reviews the content itself: keyword usage, heading structure, content depth, the foundation of a good SEO content brief. Both matter for rankings, but they address different layers of the problem. Technical issues are usually faster to fix; content gaps take longer but often produce larger ranking gains.
Do I need a developer to fix technical SEO issues?
Some issues you can fix directly in your CMS without writing code: adding canonical tags via an SEO plugin, updating meta descriptions, submitting a sitemap to Search Console, adjusting robots.txt through your hosting control panel. Others, including JavaScript rendering issues, server-level redirect rules and site speed optimisations, typically require developer involvement. Fix what you can immediately, then brief a developer on the higher-complexity items with a clear priority order and estimated traffic impact per issue.
What is the most important thing to check in a technical SEO audit?
Crawlability and indexation come first, without question. If Google can’t access and index your pages, nothing else in the audit matters. Start with robots.txt, your XML sitemap and the Coverage report in Google Search Console before investigating performance, markup or any other area. A crawlability block discovered early saves hours of follow-up work on issues that wouldn’t have affected rankings anyway.